

Paying Bills
This SOP covers the payment stage: turning approved bills into checks. Use the Pay Bills workflow to pay many bills at once, or Pay by Check Now to cut a single paper check straight from a bill. Paper checks, eChecks, and CheckSend checks can all be generated here.
Pay Bills Workflow
Use this to filter, select, and pay multiple bills in one pass.
-
Open Pay Bills
Type Pay Bills into the search bar and select the matching Task result. -
Filter for the bills you need
Set the filters, then click Search to pull up every eligible bill.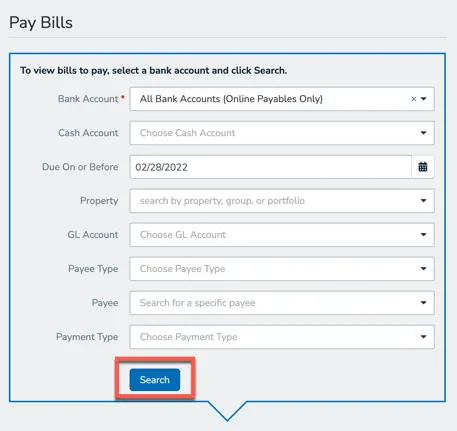
Filter What it does Bank Account Required. Choose All MICR bank accounts, All Bank Accounts (Online Payables only), or a single account. Due on or Before Date Defaults to today. Can be past or future. Leave blank to show all unpaid bills. Property Filter to one property, property group, or portfolio. GL Account Filter to bills on one GL account, for example Management Fees or Owner Distributions. Payee Type Vendor, Owner, Tenant, Management Company, or Tax Authority. Payee One payee of the selected type, for example a specific vendor. -
Select the bills to pay
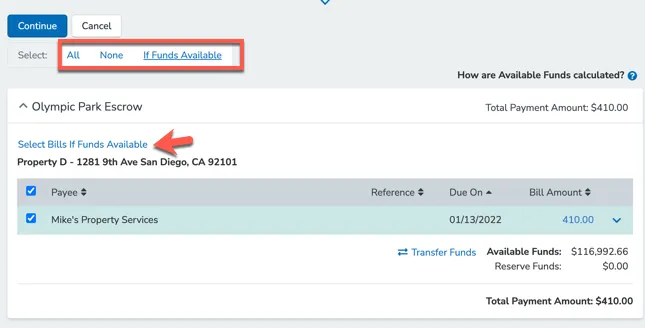
Nothing is selected by default. You have three ways to select:- Individual bills: check the box next to each bill.
- All bills for a payee: check the box next to the Payee name to select all of that payee’s bills in the bank account.
- By available funds: click Select Bills if Funds Available to auto-select only the bills that keep each property above its reserve amount. This rule applies no matter which bank account you pay from.
-
Continue
Once every bill you want is checked, click Continue at the top or bottom of the page. -
Confirm the payments
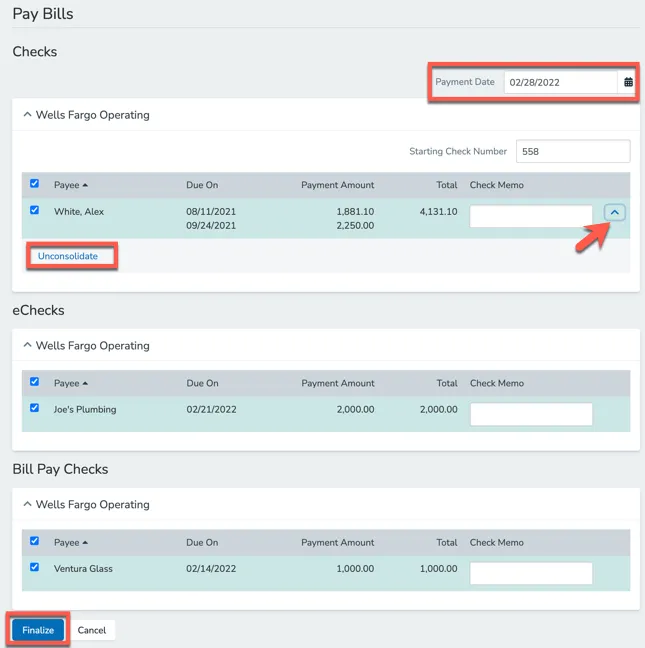
A separate section appears for Checks, eChecks, and CheckSend Checks. Review and edit as needed:- Payment date (check dates only) and starting check number.
- Check Memo: auto-filled, editable per line.
- Uncheck any bill you do not want to pay right now.
- To split a consolidated payment into multiple checks for the same payee, click the drop-down arrow on the line and choose Unconsolidate.
-
Finalize
Click Finalize. For paper checks this downloads a PDF packet to print. For eChecks and CheckSend it sends a verification code to the approver.
Available Funds and Reserves
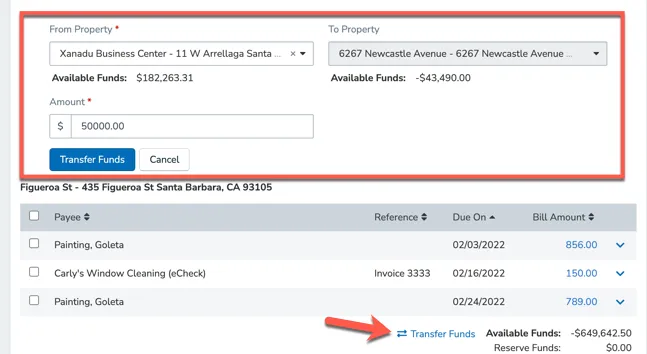
Available funds and any reserve amount show below each property, and the Total Payment Amount shows at the top of each bank account. Use these to confirm a property can cover its bills before you finalize.
Not Enough Funds? Transfer First
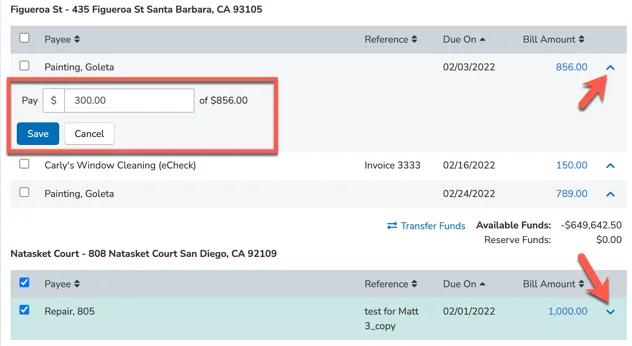
If a property is short, click Transfer Funds to move owner funds from another of their properties out of the Key Operating Cash Account. Pick the From Property, enter the amount, then click Transfer Funds. Paying from an additional cash account means you must transfer between the cash accounts or properties manually.
Partial Payments
To pay part of a bill, click the drop-down arrow on the right of the line, enter the amount to pay, and click Save. To open a bill and review it first, click the linked amount.
Pay by Check Now
Use this to cut and download one paper check straight from a bill, without running the full Pay Bills workflow. It also works to print a paper check for a payee normally set to eCheck or Bill Pay, without changing their payment settings.
-
Open the bill
Open it from the Payables index page, or type the bill amount into the search bar. -
Check the bill details
On the Bill Details page, confirm everything you want on the check is there: dates, description, memo. Click Edit to add anything missing. -
Start the check
Click Pay Bill Now, then select Pay By Check Now.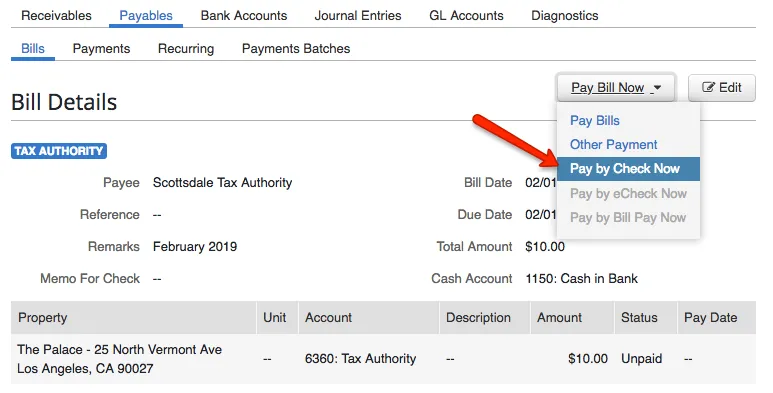
-
Enter the check number and pay
The check number defaults to the next one for that bank account. Click Confirm & Pay. A success message shows a link to download the check, dated today.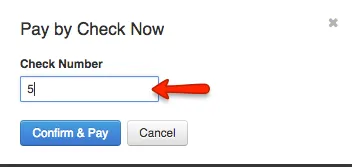
Warnings You May See
- Low funds: you are warned if the check takes the property below its available funds.
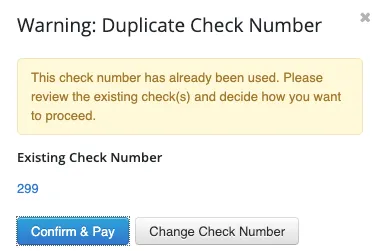
- Check number in use: you are warned if the number is already used, with a link to the existing payment. Choose Confirm & Pay or Change Check Number.
When You Cannot Use Pay by Check Now
In these cases the option is blocked and you are directed to the Pay Bills workflow instead:
- The bill has one or more partial payments.
- The bill needs two or more bank accounts to pay it (properties are not all on the same bank account).
- The bill has been reversed.
- The bill includes one or more credits.
- The cash account for the bill is not on all properties on the bill, so the system cannot tell which bank account to use.
- The payee is set to be paid by ACH.
- The bill is dated in a closed accounting period.