

Vendor Setup
AppFolio only requires a first and last name or a company name to save a vendor. That creates the record and nothing else. The vendor is not usable until the portal is activated, and activation is not something we can do for them.
Before You Create
Search for the vendor first. There are hundreds of vendors in the database and duplicates cause split payment history and misrouted bills. Type the company name or the contact name into the search bar before creating anything.
Collect, at a minimum, the following information from the vendor:
- Company name
- Billing email address
- US phone number
- Remittance address
Sometimes vendors are created after their first invoice is received on AppFolio’s Bill Entry Drafts page, and the details may come off the invoice rather than soliciting them from the vendor. This is an undesirable situation with increased risk since vendors should be properly vetted before being assigned work. This vetting includes receiving a W-9 and a Certificate of Insurance (COI) with the proper endorsements. See Send the COI Requirements Letter.
Create the Vendor
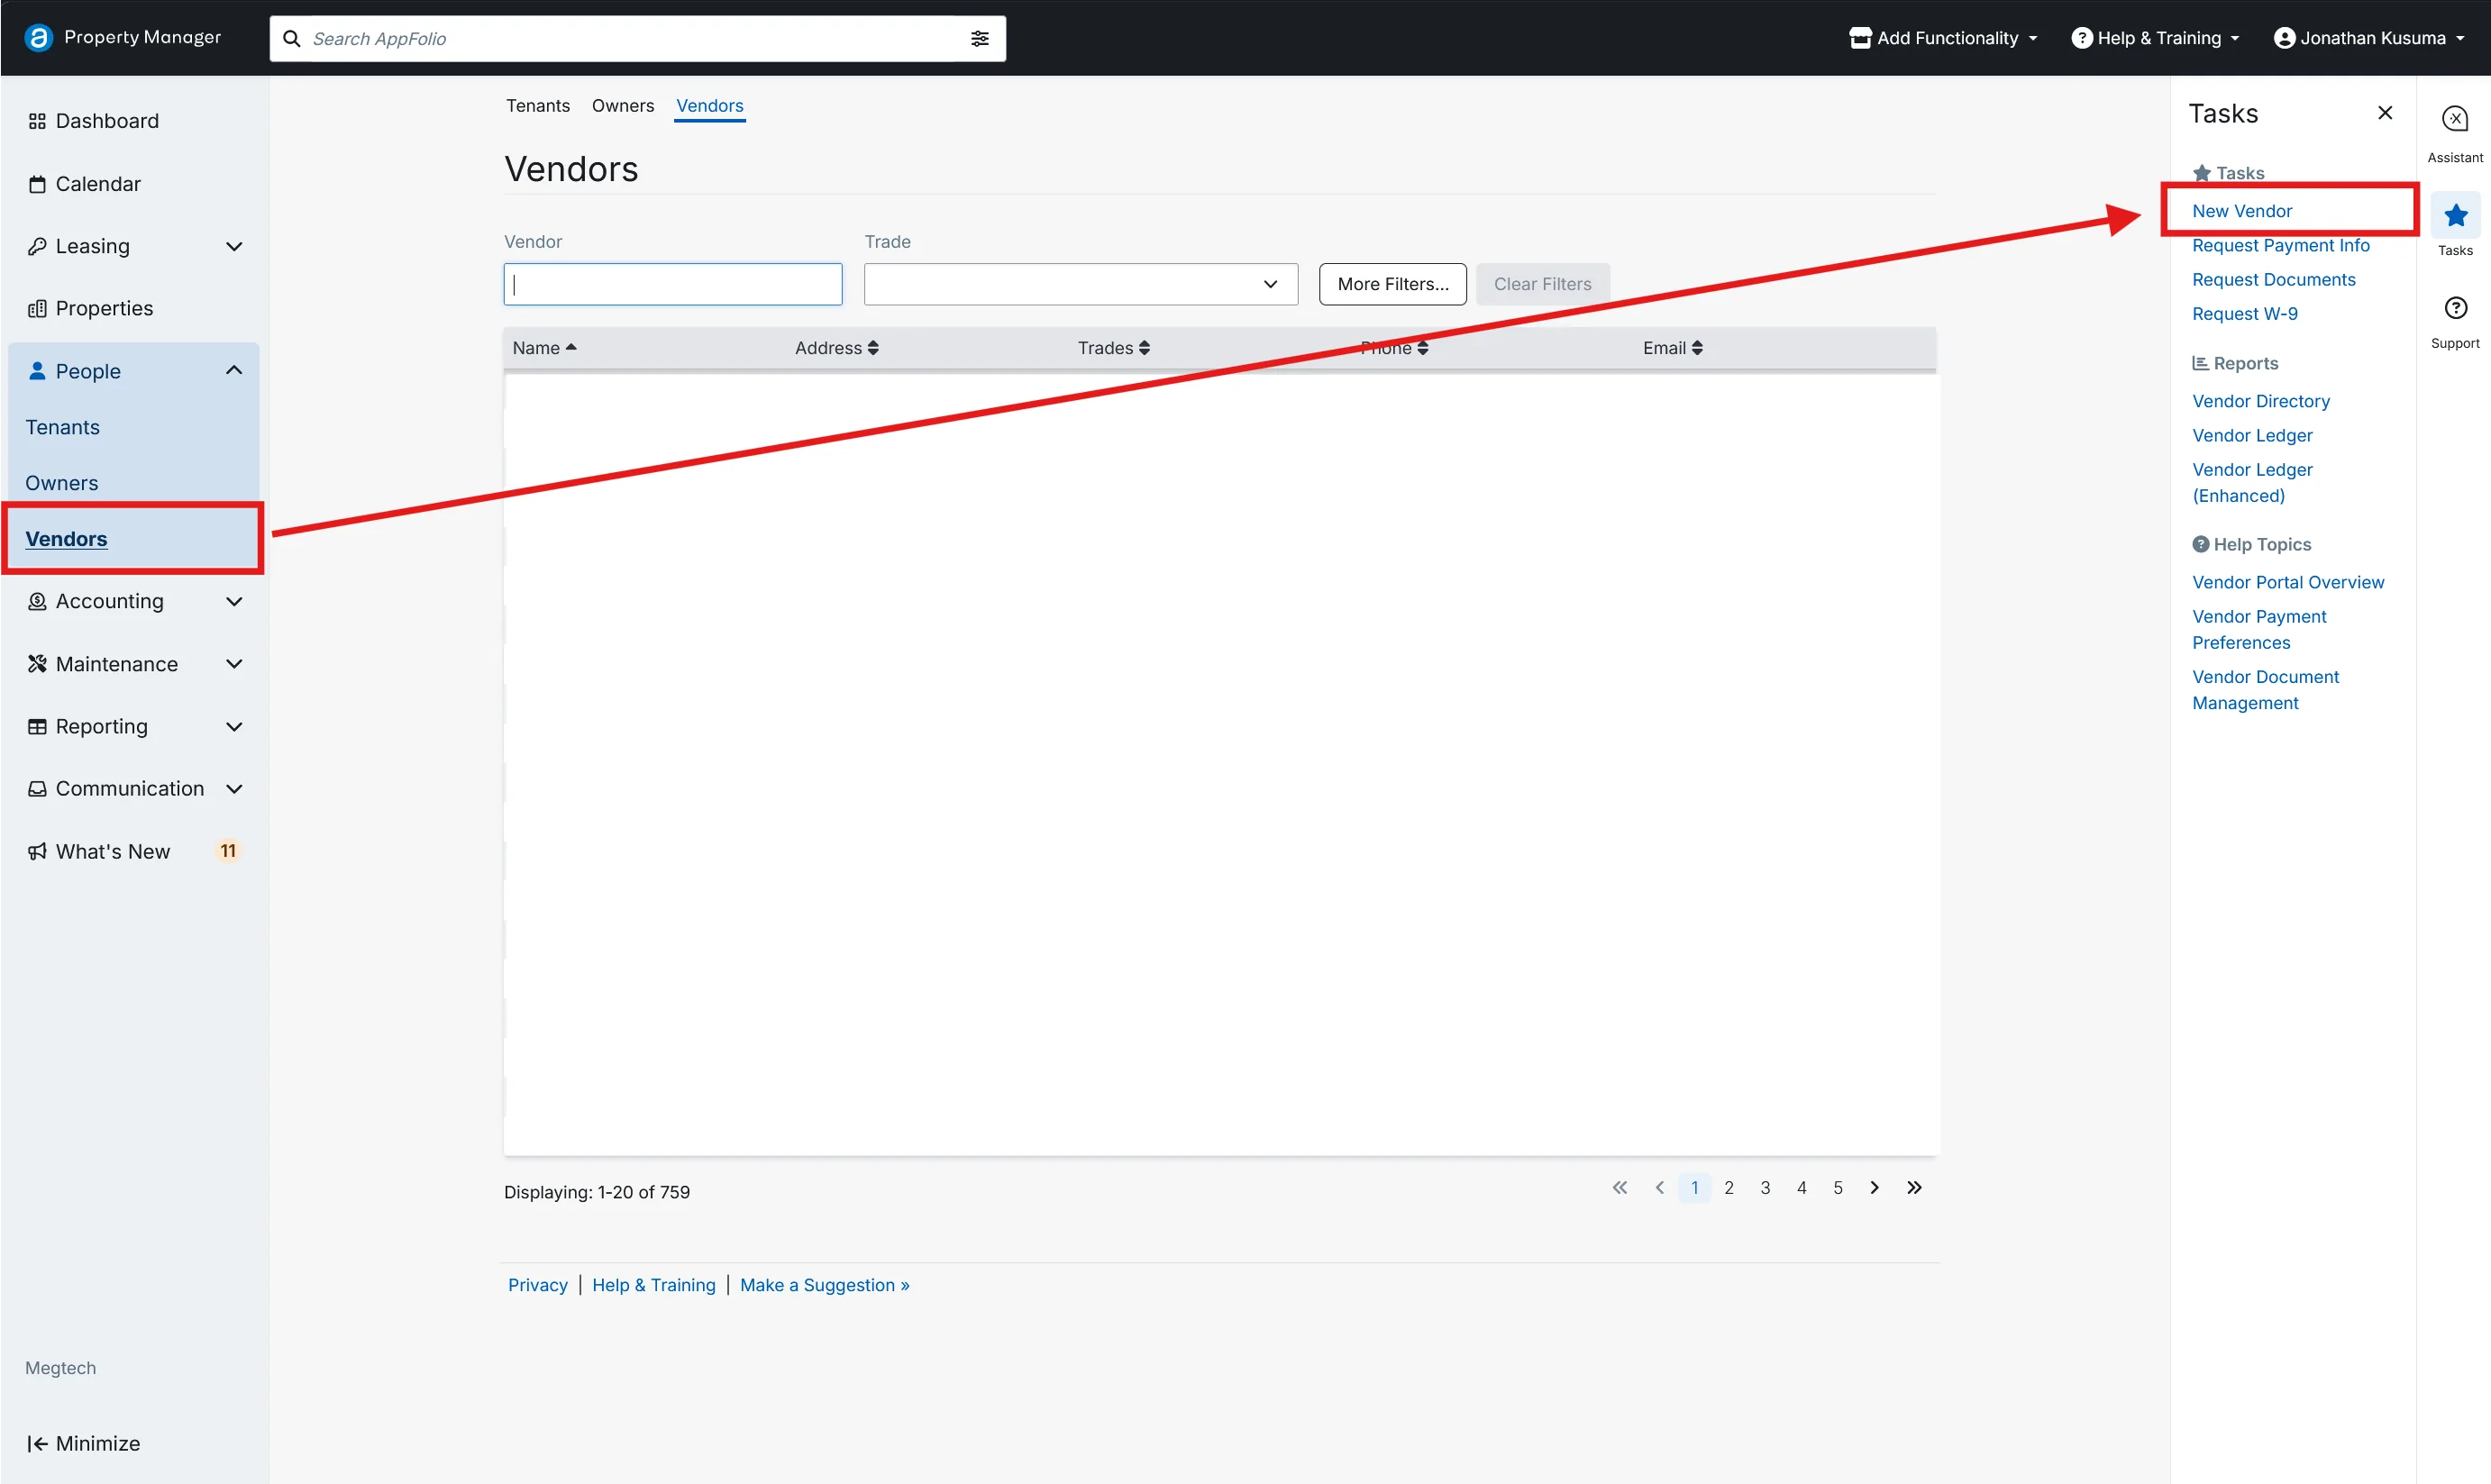
Go to People > Vendors, then click New Vendor in the Tasks menu on the right.
Vendor Information and Contact
Fill these fields:
| # | Field | Explanation |
|---|---|---|
| 1 | Company Name | Required. Information about an individual contact is not always available. First check Use company name as display name. This will also remove the required status from the First Name and Last Name fields. |
| 2 | Vendor Type | See the table below. This one is difficult to fix later. |
| 3 | Phone Number | A US phone number. Mobile preferred, though not always available. |
| 4 | All emails on the record receive work order links. The first email listed is what AppFolio uses for portal activation and eCheck receipts, so put the billing contact first. | |
| 5 | Address | The remittance address. |
| Vendor Type | Use for | Effect |
|---|---|---|
| General (default) | Maintenance and service vendors | Standard vendor behavior |
| Utility | Gas, electric, water, trash, telecom | Bills become utility bills with service dates and an account number. See Utility Vendors |
| External Management Company | Outside management companies | Used in the End Management flow when a property transfers out |
| In-house Maintenance | Companies that Megtech has contracted to perform maintenance only | Can generate a PDF invoice when billing from a work order |
External Management Company and In-house Maintenance are not currently used.
Request Information via Vendor Portal
Check the following boxes:
- Add request for payment information
- Add request for W-9 documentation
- Liability Insurance
- Worker’s Comp.
- Auto Insurance
- State License
Leave EPA Certification and Contract unchecked.
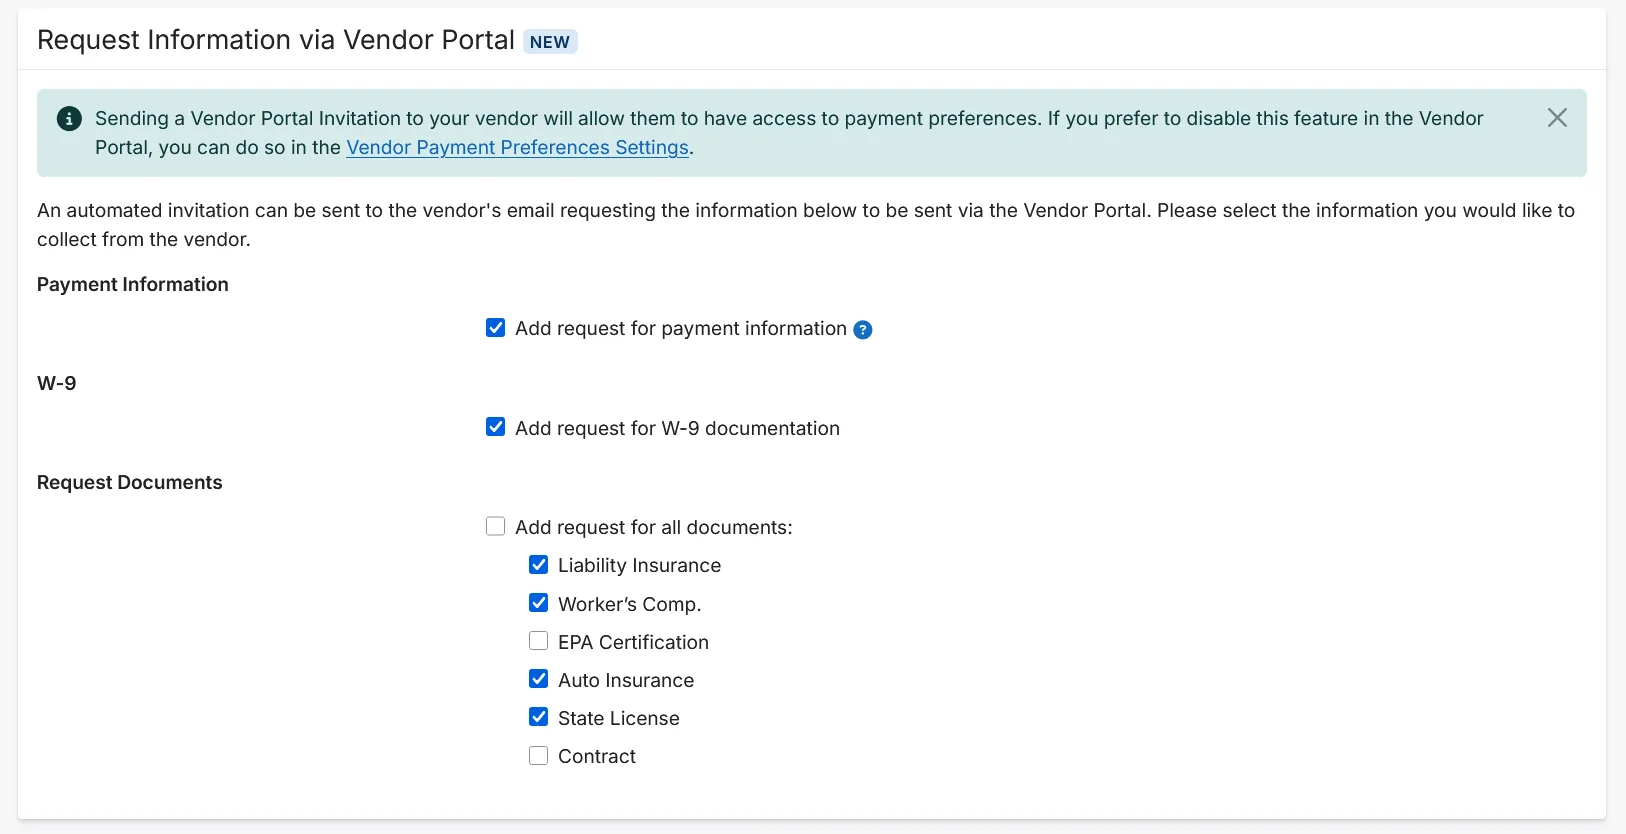
Click Save. A portal invitation letter is sent to the vendor along with the requests for ACH info, a W-9, and the four compliance documents.
Full field reference
Vendor Information
| Field | What to enter |
|---|---|
| First Name / Last Name | The primary contact at the company. |
| Company Name | Required. The billing entity. Prints on checks and the 1099. |
| Website | Optional. |
| Vendor Trade | The type of work they do. Drives Vendor Suggestions on new work orders. |
| Tags | Optional grouping. Use an existing tag before creating a new one. |
| Do Not Use Vendor for Work Orders | Check for vendors that never get assigned work: utilities, insurance, professional services. |
Contact
| Field | What to enter |
|---|---|
| Phone Numbers | A US-based mobile, typed as mobile. Multiple contact numbers can be entered as additional numbers with a label in Additional Details. |
| Emails | At least one. First in the list is the one AppFolio uses for portal activation and eCheck receipts. |
| Addresses | The remittance address, meaning where a check would be mailed. |
| 1099 Address | Leave Use vendor address as 1099 address checked unless the vendor gives a different one. |
Federal Tax
| Field | What to enter |
|---|---|
| Taxpayer Name | Confirm this after receiving the W-9. Check Use company name as taxpayer name when the name on the W-9 matches the company name. This may not be the case when a DBA is used. |
| Taxpayer ID | The EIN or SSN from the W-9 must be manually entered after the vendor uploads their W-9. Required if we file a 1099. |
| Send 1099? | Check only if we file a 1099 for them. |
| Balance Forward For 1099 | Amounts already paid this tax year outside AppFolio. Leave at 0.00 for a new vendor. |
Accounting Information
| Field | What to set |
|---|---|
| Consolidate Checks | Leave on All bills on single check unless the vendor asks for one payment per bill. |
| Check Stub Breakdown | Leave on List each bill detail line item so the vendor can match the payment to their invoices. |
| Hold Payments | Check only to stop payments. Bills can still be created, they just will not appear in Pay Bills. |
| Email eCheck Receipt | Leave checked. The receipt goes to the first email listed in Contact. |
| Payment Terms | Set if the vendor has standard terms. Bills then set the due date automatically. |
| Default Check Memo | Optional. Use for an account number the vendor wants on every check. |
| Default GL Account | Optional but recommended. Pre-fills the GL on every bill and work order for this vendor. |
| Work Order Adjustment | Required. Enter 0.0 unless there is a negotiated markup or discount. |
| Adjustment Type | Markup or Discount. Only applies if the adjustment is not zero. |
Payment Type
Leave this alone. The vendor picks their own payment method in the portal. Only users with Full Access to the Owner/Vendor PII permission can view or edit bank account information.
Invite the Vendor to Activate the Vendor Portal
The invitation goes out automatically when you click Save on the new vendor. There is no separate step to send it.
Once activated, the vendor returns at vendor.appfolio.com with their own username and password. They set up two-step verification, choose a payment method (Instant Pay, direct deposit, or mailed check), upload their compliance documents, and see their work orders. We cannot see inside a vendor’s portal.
Send the Invoice Instructions Letter
Go to Communication > Letters, then the Vendor section.
-
Click Invoice Instructions.
-
Specify the vendor name.
-
Click the Email icon.
-
BCC Alex Ondar, Assistant Property Manager, at
AssistantPM@megtechcre.com. -
Click Send.
Send the COI Documents Letter
Go to Communication > Letters, then the Vendor section.
-
Click COI Documents Instructions.
-
Specify the vendor name.
-
Click the Email icon.
-
BCC Alex Ondar, Assistant Property Manager, at
AssistantPM@megtechcre.com. -
Click Send.
Input W-9 Information and Compliance Expiration Dates
W-9 information and compliance expiration dates must be verified and entered on the vendor record manually, taken from the compliance documents after the vendor has uploaded them.
Vendor Compliance Control is currently disabled. When it is enabled, these operations and accounting actions are blocked for vendors whose compliance requirements have expired:
- Assigning a work order or purchase order
- Creating a bill from a work order or purchase order
- Creating a recurring bill
- Paying a bill
In short, you cannot do business with a vendor whose compliance requirements have expired.
Utility Vendors
Set Vendor Type to Utility for gas, electric, water, trash, and telecom during initial setup. See Vendor Information and Contact.
REA pulls utility statements from vendor portals on the 1st and 15th rather than waiting for the vendor to email them. See AP Processing Workflow.
Setup Checklist
| Item | |
|---|---|
| ☐ | Searched first, no duplicate record exists |
| ☐ | Company Name required (select Use company name as display name) |
| ☐ | Vendor Type correct (Utility for utilities) |
| ☐ | Billing email entered first in the Emails list |
| ☐ | US phone number entered (mobile preferred) |
| ☐ | Remittance address entered |
| ☐ | W-9, ACH info, and compliance documents requested |
| ☐ | Portal invitation sent (automatic on Save) |
| ☐ | Invoice Instructions letter sent |
| ☐ | COI Documents Instructions letter sent |
| ☐ | Input W-9 information and compliance expiration dates |